
Essential Subscriptions app: setup and feature walkthrough
This guide walks through the whole app in order, from install to analytics. Each section says what a feature is, gives the key steps, and links to the full article.
The app is free. Every feature is included. See App Pricing.
What the app does:
- Shows a subscription widget on your product pages, with your plans and discounts.
- Sells pay as you go and prepaid subscriptions.
- Offers volume bundles (pack sizes with an extra discount) and free gifts on the first order.
- Gives subscribers a customer portal to skip, pause, cancel and change their subscription.
- Asks customers why they cancel or pause, and can answer with an offer.
- Lets you manage, edit and create subscriptions in the app.
- Emails your customers and your team about subscription events.
- Retries failed payments and out-of-stock orders on rules you set.
- Shows subscription analytics: MRR, growth and churn.
1. Install and turn on the app embed
The Home page has a Setup Guide with five steps. Work through them from the top. Stuck on one of steps 1 to 3? Click Contact support on it.
The first step makes the widget show on your product pages.
- On Activate app embed in Shopify, click Activate.
- The theme editor opens at App embeds. Check that Essential Subscriptions is on.
- Click Save in the theme editor.
To place the widget in an exact spot, add the Campaign Widget app block to your product page instead. You need only one of the two.
The App status card on Home shows Active when the embed or an app block is on in your live theme.
Full guides: Getting started with Essential Subscriptions app and Subscription Widget Not Showing? Checklist and Placement.
2. Create a campaign from a template
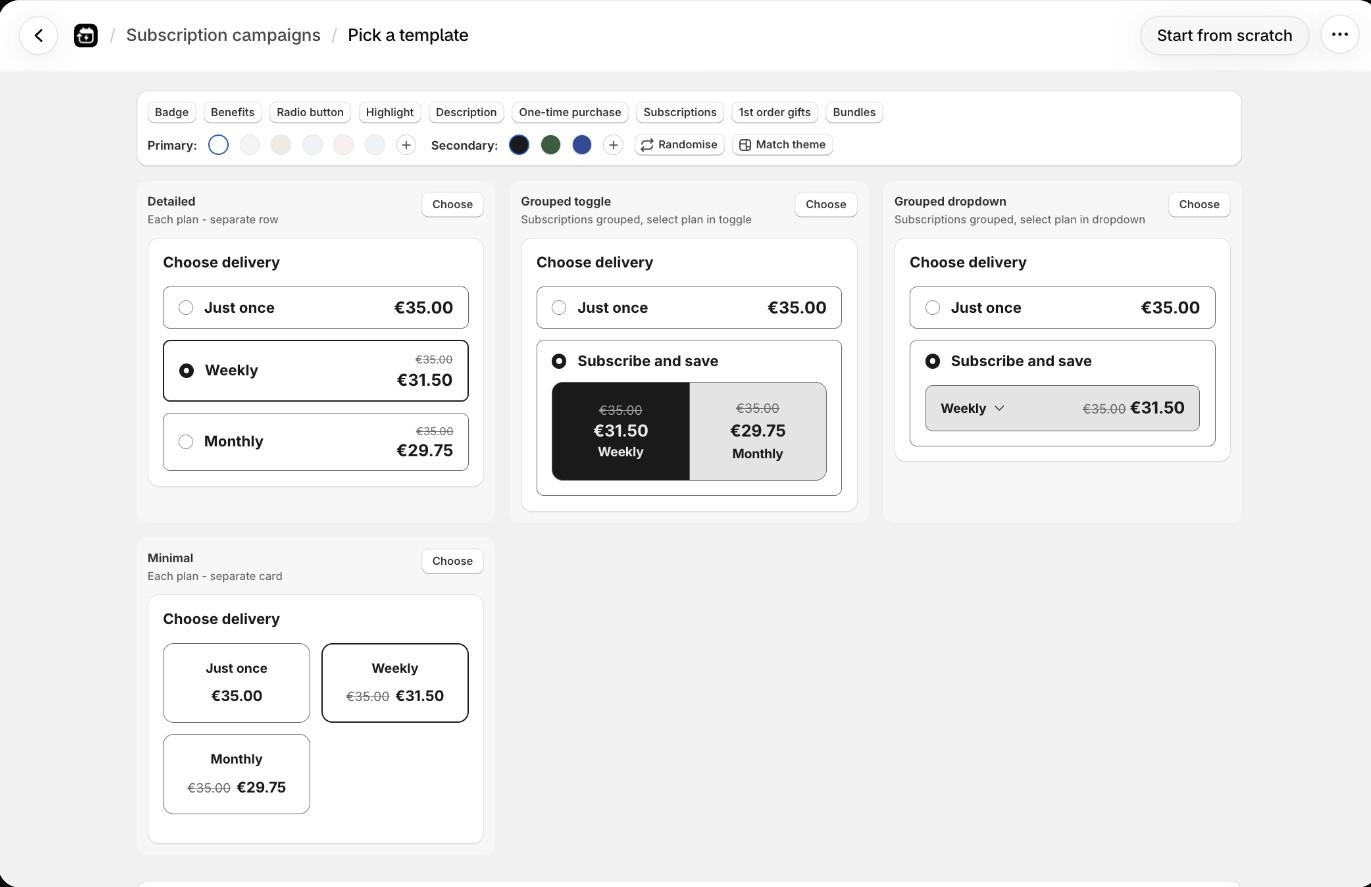
A campaign is your subscription offer: which products, how often orders ship and bill, the discount, and how the widget looks. You can run several campaigns for different products.
- Open Campaigns in the app menu, then click Create subscription campaign. The Pick a template page opens.
- Use the chips at the top to pick features, such as Badge, Benefits, Subscriptions, 1st order gifts and Bundles.
- Pick colours, or click Match theme.
- Click Choose on a layout: Detailed, Grouped toggle, Grouped dropdown or Minimal. Or click Start from scratch.
A layout opens the campaign editor with sample plans and discounts. Start from scratch opens it with one plan, Monthly, at 0% discount. Nothing is saved until you save it. Check the plans before you publish.
The editor has five tabs: Purchase options, Widget, Style, Products and Volume bundles.
Full guides: Start a Campaign from a Template and How to Create a Subscription app Campaign.
3. Set up purchase options: pay as you go and prepaid

Each plan is one choice the customer can pick, such as every 2 weeks or every month. Plans are on the Purchase options tab.
- Click a plan card to open it, or click Add purchase option.
- Set Deliver every.
- Under Billing policy, pick Pay as you go or Prepaid.
- Under Pricing policy, set the Discount as a Percentage or Amount off.
| Billing type | How it works |
|---|---|
| Pay as you go | The customer is charged on a schedule, and each charge creates an order. Optional: a fixed charge day, an expiry after a number of payments, a minimum number of payments before the customer can cancel, and a discount that changes after a number of payments. |
| Prepaid | The customer pays once for several deliveries. Set Charge for, the number of deliveries one payment covers. A prepaid plan renews each term until the customer cancels, unless you set it to expire. |
A new campaign also has a one-time purchase called "Just once". Delete it to sell by subscription only.
Full guides: Prepaid and Pay as You Go Subscriptions Explained and Sell a Product by Subscription Only.
4. Add volume bundles (optional)

Volume bundles give a better price for more items. Each bundle is a pack size, such as a 3 pack, with an extra discount on top of the plan discount.
- Open the Volume bundles tab and click Add volume bundle.
- In each bundle, set the Name, the Quantity and the Discount on top of the purchase option discount.
- Choose Apply to all purchase options or Apply to selected purchase options.
- On the Widget tab, open Layout and pick where the bundles show.
You don't need to create a discount. When you save a published campaign, the app creates one in Shopify admin > Discounts called Volume bundles: [your campaign name]. It keeps applying on renewals.
If you don't see the Volume bundles tab, contact support.
Full guides: How to Set Up Volume Bundles and How the Volume Bundle Discount Works.
5. Add a 1st order gift (optional)
Give a free product with the first subscription order. Later orders don't include it.
- On the Purchase options tab, open a plan and open 1st order gift.
- Search or Browse for the gift products and set the quantity.
- Check the Discount name. Shoppers see it in the cart and at checkout.
- Click Save, then Publish.
The app creates the discount for you, called Free subscription gifts: [your campaign name]. The one-time purchase can't have gifts.
Full guide: How to Give a Free Gift with the First Subscription Order.
6. Customise the widget and its style
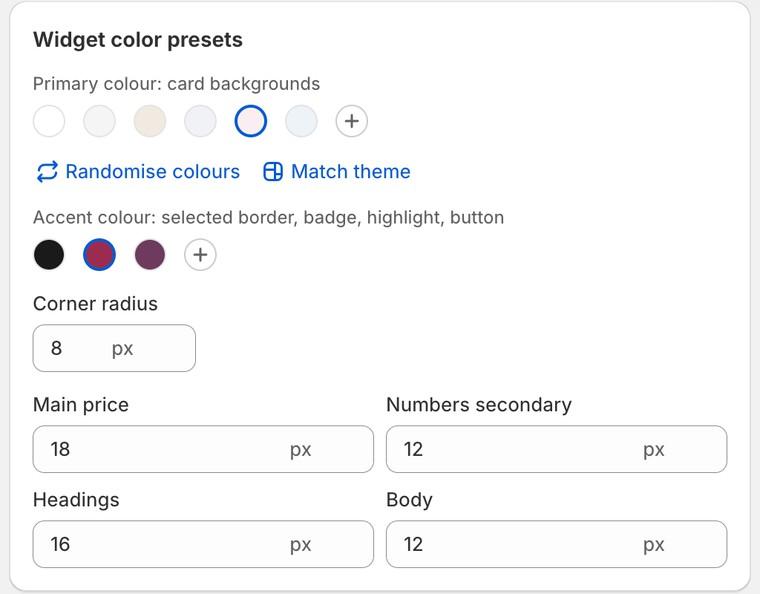
The Widget tab holds the layout and every text customers read. The Style tab holds colours, sizes and borders. The preview on the right updates as you go.
- Widget tab, Layout: the header, how the one-time purchase shows, the preselected option and the layout.
- Widget tab, Subscription options: the crossed-out price, badges, benefits, highlights and descriptions for each plan.
- Style tab, Widget color presets: set the whole look at once, or click Match theme. The cards below style each part.
- Custom CSS, at the bottom of the Widget tab, for anything the settings don't cover.
- Translations, on the Widget tab, when your store has a second published language.
Full guides: How to Customise the Subscription Widget and Widget Wording, Translations and the Subscription Details Tooltip.
7. Assign products
- Open the Products tab.
- Click Add products and pick whole products or single variants. Or click Add all products.
A campaign needs at least one product before you can publish it. If you pick single variants, the widget only shows while one of them is selected.
Full guide: How to Create a Subscription app Campaign.
8. Publish
- Click Publish at the top of the campaign editor.
- Open a product page on your live store and check the widget shows.
- Place a test subscription order. Check it shows in Subscriptions as Active.
On a published campaign, every save is live straight away. Existing subscribers keep the terms they signed up on. Unpublishing stops new customers from subscribing. Existing subscriptions keep billing.
Widget not showing? See Subscription Widget Not Showing? Checklist and Placement.
9. Set up the customer portal

The customer portal is where subscribers manage their own subscriptions in their customer account.
- Open Customer portal in the app menu.
- On Add subscriptions app extension to Customer Account, click Add app extension. Add the extension in the Shopify editor and click Save.
- Back in the app, click I've done this.
- Place a test order, check the subscription shows in the customer account, then click Everything's fine.
- Copy the Customer portal link from the Customer portal access card. Add it to your store menu or footer.
In the portal, customers can skip and unskip orders, pause, resume and cancel, update their address and payment method, and see past orders. The app's emails also carry a Manage your subscription button.
Customer product changes. You can let customers change their products. Open the campaign. On the Purchase options tab, tick what they may do in Customer product changes: Change variants (such as size or color), Swap to another eligible product, Change product quantities and Keep subscription discounts after changes. All start off. Customers then see Make product changes. Prepaid subscriptions can't be changed.
Full guides: How to setup Customer Portal on the Subscriptions app and What You Can Change, and What Only Your Customer Can Do.
10. Retention surveys and offers
When a customer clicks Cancel subscription or Pause subscription in the portal, you can ask why. You can answer a reason with an offer before they confirm.
- Open Customer portal. In the Retention card, click Customize on Cancelation reason survey or Pause reason survey.
- Tick the box to show the survey to your customers. Both surveys are off until you do.
- Edit the Reasons.
- Under a reason, click its offer line and pick an offer: Discount, Skip, Change frequency, Swap product, Contact support, or Pause (cancel survey only).
- Click Save.
The reasons show on the subscription's Timeline and in Analytics on the Churn tab.
Full guide: Cancellation and Pause Surveys with Retention Offers.
11. Manage subscriptions

Open Subscriptions in the app menu. Filter with the tabs at the top, or search by customer name, email or contract ID. Click a row to open the subscription.
| You want to | Where |
|---|---|
| Pause, resume or cancel | Buttons at the top of the detail page |
| Change products or quantities | Main card, Edit |
| Change a product's price | Main card, Edit, then click the price |
| Change delivery or billing frequency, charge day, expiry or minimum payments | Delivery and billing box, Edit |
| Skip or unskip an order | Orders card, Upcoming tab |
| Fix the delivery address | Customer card, edit icon |
| Help with an expired card | Send link to update payment |
Changes apply to future orders only. Products, prices and the policy can't be edited on prepaid subscriptions. The Timeline records who changed what and when.
Full guides: How to Manage Subscriptions and What You Can Change, and What Only Your Customer Can Do.
12. Create a subscription manually
Create a subscription for one customer yourself, for example after a phone request.
- Open Subscriptions and click Create subscription.
- Click Select customer. The customer needs a payment method already saved in Shopify.
- Set the Next order date (tomorrow or later), the delivery, the products, the discount and the schedule.
- Tick Send new subscription confirmation email. if the customer should get one. It is unticked by default.
- Click Save.
Nothing is charged when you save. The first charge runs on the next order date.
Full guide: How to Create a Subscription for a Customer Manually.
13. Move subscriptions from another app
Our support team imports your subscriptions in bulk from a CSV file. You can't run the import yourself.
- Set up the app for new customers first.
- Export your active subscriptions from your old app as a CSV.
- On Home, in Migrating from another app?, click Contact support and send the file.
- Imported subscriptions arrive Paused with an Imported badge. For each one, cancel it in the old app, then click Activate subscription here.
Only subscriptions whose payment method is saved in Shopify can be imported. To add subscribers one by one instead, use Create subscription (section 12).
Full guides: Migrating to Essential Subscriptions from Another Subscription App and How to Import Subscriptions in Bulk from Another App.
14. Customer emails

The app emails your customers about upcoming charges, new subscriptions, skips, pauses, resumes, cancellations and failed payments. All nine are on by default.
- Open Settings and click Email notifications to customers.
- Click Disable or Enable next to an email to switch it off or on.
- Click an email to edit its subject, wording and buttons, and add translations.
- Click Send test email to check it. The test goes to your store email.
Set the colours under Email template customisation in Settings.
Full guide: Subscriptions app Customer Notification Emails.
15. Sender email and DKIM
Customer emails are sent from noreply@essentialsubscriptions.com, with your store name as the sender name. You can send from your own address instead.
- Open Settings. In Notification settings, click Customise next to Customise sender email.
- Select Custom, fill in the fields and click Save.
- Add the two DNS records (one CNAME, one TXT) at your domain host.
- Click Verify. Then click Send test email.
Until your domain is verified, emails keep going out from the default address.
Full guides: How to Customise Sender Email on Subscription app and How to Set Up DKIM for Your Sender Email.
16. Staff notifications
The app can email you about new subscriptions, churn, and failed payments or stock.
- Open Settings and click Email notifications to store staff.
- Tick the events you want in each group: new events, churn and failures.
- Set Get notified for each group, from For every event to Every 30 days. The default is Every 3 days.
- Click Save.
Notifications go to your store email. Keep the failure group on. For out-of-stock orders it is the only email anyone gets.
Full guide: Staff Notifications on the Subscriptions app.
17. Billing and inventory retry settings
These decide how the app retries a declined payment or an out-of-stock order, and what happens when retries run out.
- Open Settings, then Billing and inventory settings, then Change.
- For Payment Method Failure and for Not Enough Inventory, set the Number of retry attempts, the Days between retry attempts and the Action when all retry attempts have failed.
- Click Save.
| Defaults | Retries | Days apart | Then |
|---|---|---|---|
| Payment fails | 3 | 7 | Cancel subscription |
| Not enough inventory | 5 | 1 | Cancel subscription |
Charges run once a day, around midday in your store's time zone.
Full guides: Subscriptions app Billing and Inventory Settings and When Customers Are Charged, and What Happens When a Payment Fails.
18. Analytics

Open Analytics in the app menu. Pick a date range at the top.
- Overview tab: MRR, Active subscriptions, Failed payments, and new, churned and reactivated subscriptions over time.
- Churn tab: churn rates, pauses, and the cancel and pause reasons from your surveys.
A short version shows on Home under Past 30 days.
Full guide: Subscription app Analytics.
19. Shopify limitations
Some rules come from Shopify and apply to every subscription app. The main ones:
- Your store needs a payment gateway that supports subscriptions, such as Shopify Payments or PayPal Express.
- Gift cards and store credit only work on the first order, not on renewals.
- The app does not support selling subscriptions on Shopify POS.
- Cancelling or refunding an order does not cancel the subscription. Cancel it in the app too.
- 48 hours after you uninstall the app, Shopify cancels its subscriptions that have not ended.
Full guide: Shopify Limitations for Subscriptions.
Need help?
On Home, click Contact us under 24/7 human support. You can also Book a call with a founder from the bottom of any page.