How to Set Up Cart Upsells: Step-by-Step Walkthrough
An upsell shows product suggestions inside the cart drawer. Customers add them with one click, at full price or at a discount.
This guide takes you from an empty offer list to a finished upsell, step by step.
Before you start
You don't need to turn the cart drawer on first. Build your upsell now and check it in the editor preview. Everything you save is kept.
Upsells are set up under Upsell in the editor's left menu.
Upsell has three tabs above the offer list:
Tab
What you set there
Offers
Who sees the offer and what it offers: trigger, products, discount
Widget
How it looks in the cart: layout, offer name, badges, button
Design
Colours, fonts, borders and spacing
The offer list stays on every tab. On Widget and Design, clicking an offer only picks which offer the preview shows.
Step 1: Add an offer
Open Essential Cart Drawer and open your cart drawer in the editor.
In the left menu, click Upsell.
Under Upsell offers, click Add offer.
The new offer appears at the top of the list, already switched on. It gets a name with today's date, for example 2026 Oct 12 Cart upsell. The grey line under the name sums up the offer (trigger, products, discount) so you can tell offers apart at a glance.
Step 2: Name the offer
On the Offers tab:
Internal offer name: only you see this, in the offer list. Rename it to something useful, like Socks with shoes.
The Trigger card decides which carts show the offer.
All products: the offer can show for any cart.
Specific products: the offer shows only when one of the products you pick is in the cart. You can pick single variants.
Specific collections: the offer shows when the cart holds a product from a collection you pick.
Watch out: don't make the trigger product the only product on offer. If "Hide products that are already in cart" is ticked, there is nothing left to show, and the offer stays hidden.
Optional: add sub-triggers
A sub-trigger adds extra conditions on top of the trigger. Under the trigger, click Add a sub-trigger. Pick a Condition, an Operator and a value.
Condition
Operators
What it checks
Example
Cart value
Is more than, Is less than, Is equal to
The cart total, in your store currency
Cart value is more than 50
Customers country
Is, Is not
The country the customer is in, from their location
Customers country is Germany
Customers tag
Is, Is not
Tags on the customer in Shopify. Customers who aren't logged in have no tags
Customers tag is VIP
Product tag
Is, Is not
Tags on the products in the cart
Product tag is summer
Products in cart
Are any of, Are all of, Are not any of, Are not all of
Products you pick (up to 50)
Products in cart are not any of: Gift card
Number of products in cart
Is more than, Is less than, Is equal to
How many items are in the cart
Number of products in cart is more than 2
Market
Is, Is not
The customer's Shopify Market
Market is Canada
How conditions combine:
Conditions in one block must all be true. Click And to add another condition to the block.
To add an alternative, click Add a sub-trigger again. The new block starts with Or when. The offer shows if any one block is true.
Up to 10 blocks per offer, up to 10 conditions per block.
Exclude offer products. For Cart value and Number of products in cart you can tick Exclude offer products from this value (or from this count). Products added from this offer then don't count, so accepting the offer can't change whether it shows.
Use the icons on each block to duplicate, delete or collapse it. A collapsed block shows a one-line summary, like When cart value is more than $50.00.
Sub-triggers and the discount: with Apply discount set to Only if the trigger product is also in cart and sub-trigger conditions are met (Step 5), checkout checks some conditions again: Cart value is more than, and Number of products in cart (Is less than and Is equal to only when offer products are excluded from the count). The other conditions only decide whether the offer shows.
Step 4: Choose what to offer
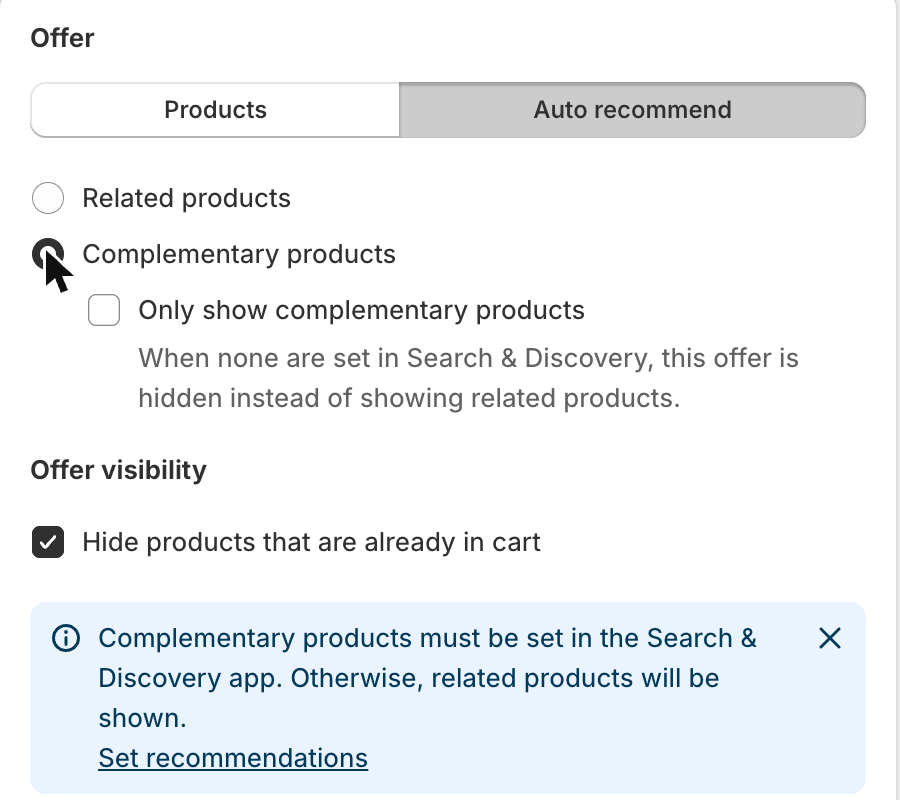
In the Offer card, pick one of the two buttons:
Products: you hand-pick the products. Pick variants if you want, and drag the rows to set the order.
Auto recommend: Shopify picks products based on what is in the cart. Choose Related products or Complementary products.
Under Offer visibility, tick Hide products that are already in cart. Customers then never see a product they already added.
Why Auto recommend shows certain products: the picks come from Shopify's recommendation engine, seeded on the first product in the cart. Complementary products only work if you set them in Shopify's Search & Discovery app. Without them, related products show instead. To stop that, tick Only show complementary products under the Complementary products option. Then the offer hides when there are none, and the next offer takes its place. To control the list exactly, use Products.
Watch out: a picked product only shows if customers can buy it. If a product is Draft, Archived, not published to the Online Store, or out of stock, its row shows the reason in red. If every product in the offer is unavailable, a banner says the offer will not show.
Step 5: Add a discount (optional)
In the Discount card, pick the discount type:
Choice
What customers get
No discount
Products at their regular price
Percentage
A % off every product in the offer
Fixed amount
A set amount off every product in the offer
Custom
A different discount per product. Set it on each product row. Only with Products, not with Auto recommend
Once a discount is set, you can also fill in:
Discount message: shown to customers at cart and checkout when the discount applies, for example Bundle deal.
Apply discount:
Always: the discount applies whenever the product is added from the offer.
Only if the trigger product is also in cart and sub-trigger conditions are met: if the customer removes the trigger product, the discount goes away. This choice is not available with the Specific collections trigger.
The discount applies automatically at checkout. No code is needed.
Step 6: Pick a layout and set the texts
Switch to the Widget tab.
Layout. Pick one of six layouts:
Layout
What it looks like
Carousel
One product card at a time, swipe or click for the next
Stacked
Products listed under each other
Gallery carousel
Tall tiles with the image on top, two or more in view
Minimal versions
The same three layouts without the grey card background
Upsell settings card:
Offer name: the heading customers see above the products. The default is You may also like.
Badge (optional): a small label next to the offer name, like Limited offer. Use {discount} to show the offer's discount, like 10%.
Products in carousel viewport (Carousel and Gallery carousel): how many products are in view at once. A value like 1.3 shows a peek of the next product, which tells customers they can swipe.
Visible products (Stacked): how many products show at once.
Symbols (Carousel and Gallery carousel): the navigation marks. Choose None, Chevron, Arrow or Dots, and where they sit.
Product card card:
Show strike through price: shows the original price crossed out next to the discounted one.
Savings badge (optional): a badge on each product, like You save {savings}. {savings} is the money saved per item. {discount} is the offer's discount.
Button card:
Button text: the label on the add button. The default is Add.
Pick a button style: Solid, Outline or Link, each with or without an icon, or an icon-only version (8 styles in total).
With an icon style, you can swap the plus for a cart icon or upload your own icon, and set its size.
Good to know: layout, symbols, button style and design are shared by all your cart upsell offers. Offer name, Badge, Savings badge and Button text belong to each offer.
Step 7: Match your brand
Switch to the Design tab. Each card styles one part of the upsell:
Card
What you can change
Spacing
Space above and below the upsell
Offer
Background, border, offer name text and alignment, offer badge, symbol size and colour
Product card
Background, border, image corner radius, product name, variant, price and strike-through price text
Button
Background, border, alignment (image-on-top tiles only) and text
Savings badge
Background, border and text
For every text you can set size, colour and weight, plus Italic, Underline and Uppercase.
Step 8: Preview, translate and save
Check the preview on the right. To see your own products in it, use Preview products at the top of the editor.
To translate the offer name, button text, badges and discount name, open the Translations card at the bottom of the Offers or Widget tab.
Click Save.
Your upsell is ready. Customers see it once your cart drawer is turned on. If it's already on, open your store, add the trigger product to the cart and check that the offer shows.