
Getting started with Essential Subscriptions app
Essential Subscriptions lets shoppers subscribe on your product pages. Orders are then created on a schedule, and subscribers manage their subscriptions from their customer account.
This guide walks you through the Setup Guide on the app's Home page. It has five steps.
The Setup Guide
Open the app. The Home page shows the Setup Guide: "Follow these steps to start using Essential Subscriptions". Work through the steps from the top. Each step has a main button and a second button to get help or mark it done. A step gets a tick when it is done.
Stuck on one of steps 1 to 3? Click Contact support on that step.
When you finish the last step, the Setup Guide goes away. You can also hide it yourself with Dismiss in its menu.
Step 1: Activate app embed in Shopify
This makes the subscription widget show on your product pages.
- On the step Activate app embed in Shopify, click Activate.
- The theme editor opens in a new tab, at App embeds. Check that Essential Subscriptions is switched on.
- Click Save in the theme editor.
- Go back to the app tab. The step gets a tick.
Adding the Campaign Widget app block to your product page works too. You need only one of the two.
The App status card at the top of the Home page shows Active when the app embed or an app block is on in your live theme. If it shows Inactive, or the widget does not show later, see Subscription Widget Not Showing? Checklist and Placement.
Step 2: Create a subscription campaign & customise widget
A campaign is your subscription offer: which products it is on, how often orders are delivered and billed, the discount, and how the widget looks.
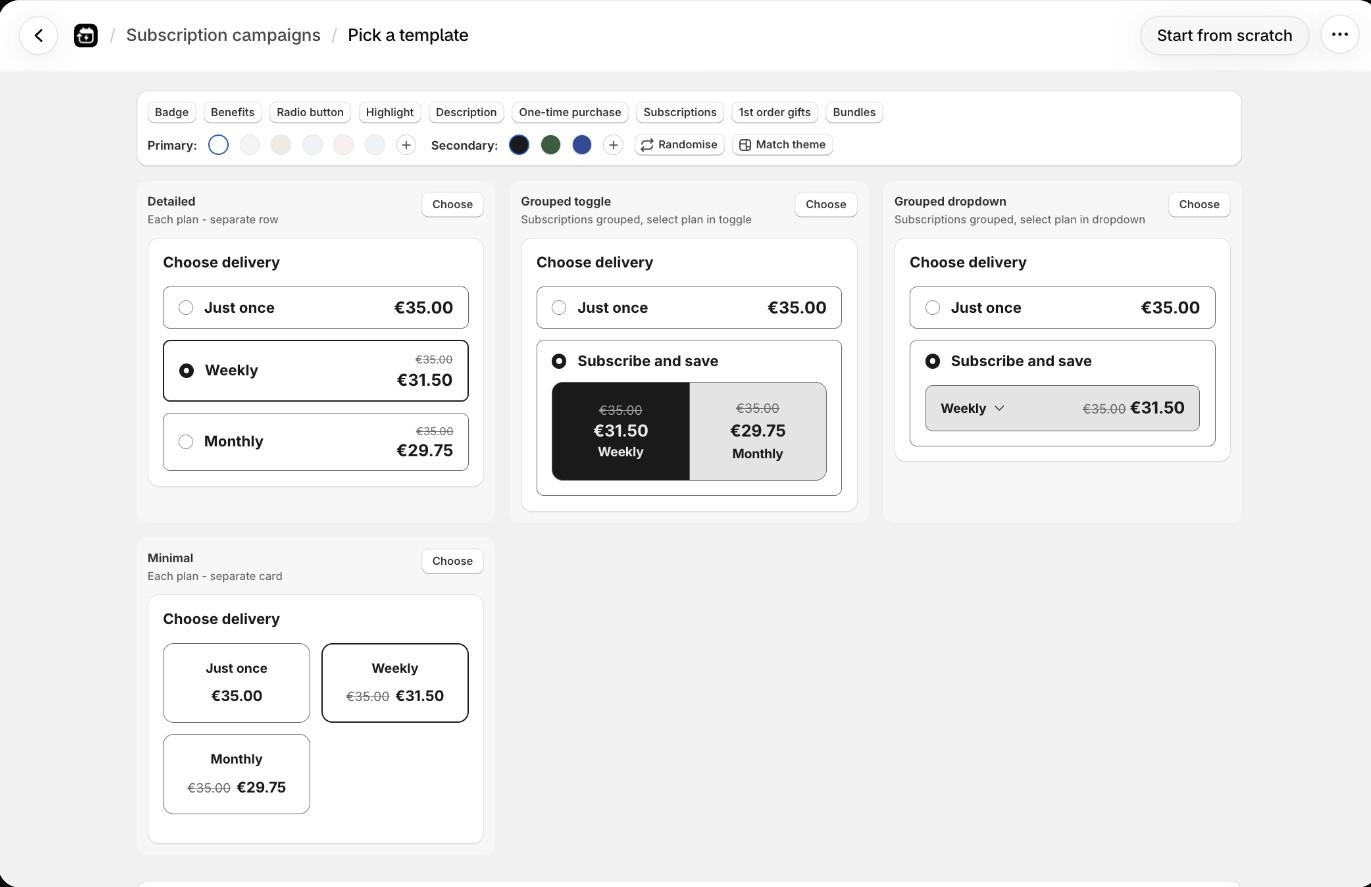
- Click Create campaign. The Pick a template page opens.
- Pick the features you want, then click Choose on the layout you like. Or click Start from scratch.
- A layout opens the campaign editor with sample plans and discounts filled in. Start from scratch opens it with one plan, Monthly, at 0% discount. Check them on the Purchase options tab.
- On the Products tab, add the products that should offer the subscription.
- Click Publish.
The step gets a tick when you save your first campaign.
See Start a Campaign from a Template, How to Create a Subscription app Campaign and How to Customise the Subscription Widget.
Step 3: Enable customer portal
The customer portal is where subscribers manage their subscriptions in their customer account.
- Click Set up customer portal. The Customer portal page opens.
- Follow its steps: Add app extension, then place a test order and click Everything's fine on Confirm customer portal is working.
This Home step gets a tick when you confirm the portal is working. See How to setup Customer Portal on the Subscriptions app.
Step 4: Review customer notification emails
The app emails your customers about subscription events, such as upcoming charges, new subscriptions and failed payments.
Click Review notifications. The Settings page opens, and opening it marks this step done. You can also click I've done it. See Subscriptions app Customer Notification Emails.
Step 5: Confirm subscriptions are working properly
Place a test order to check everything end to end.
- Open a product page on your store that has your published campaign.
- Check that the subscription widget shows your options.
- Pick a subscription option, add it to the cart and complete a test checkout.
- Open your customer account. The subscription should be there.
- In the app, open Subscriptions. The test subscription should show as Active.
- If all is well, click Everything's fine. If not, click I need help.
The rest of the Home page

- App status: whether the widget is live. The buttons next to it show App embed on or off, and how many app blocks are on. Click one to open the theme editor.
- Migrating from another app?: click Contact support and our team imports your existing subscriptions. See Migrating to Essential Subscriptions from Another Subscription App.
- Past 30 days: Active Subscriptions with how many are new, MRR, and Failed payments with how many were recovered. Click View analytics for more. See Subscription app Analytics.
- Subscription campaigns: your campaigns with their status. Click Create campaign to add one, or View all.
- 24/7 human support: click Contact us to write to our team. There is also a getting started video.
At the bottom of every page you can Book a call with a founder for help with setup.
Where to go next
- Prepaid and Pay as You Go Subscriptions Explained, before you pick a billing type
- Cancellation and Pause Surveys with Retention Offers, to keep subscribers who try to leave
- How to Give a Free Gift with the First Subscription Order
- What You Can Change, and What Only Your Customer Can Do
- App Pricing